In this tutorial we will create a simple elegant intertwining pattern – the basic knitting one. We’ll make it as a repetitive seamless pattern and save it as a pattern swatch in Illustrator. Don’t hesitate to download the .ai source file.
Step 1
Open Adobe Illustrator, create a new file and with a pen tool (P) make a simple S-shaped path as in the image below. Give it a 5px stroke. Select it (V) and go to Effect > Distort & Transform > Transform… panel. Type 1 copies, check “Reflect X” and choose the top right corner as the transform origin.

Step 2
The rectangle that contains my S-shaped path is 20px x 50px so a single “loop” is 40px wide. Go again to Effect > Distort & Transform > Transform… panel and add another transform : create a copy that is shifted 40px to the right.

Step 3
One again go to the Transform panel, this time we’ll move the “loops” down of about 60% of their height (here 31px).

Step 4
Go to the Object menu and click Expand Appearance. Go again to the Object menu and now click Expand, making sure that “Stroke” is checked in the pop-up window.

Step 5
If you go the Layers panel now, you’ll find there a group (4 “loops”) composed of two subgroups (2 “loops” each) composed of 2 subgroups of a single “loop” each. Select the first level subgroup (2 “loops”) and click on “Unite” in Pathfinder panel. Repeat for the second subgroup.

Step 6
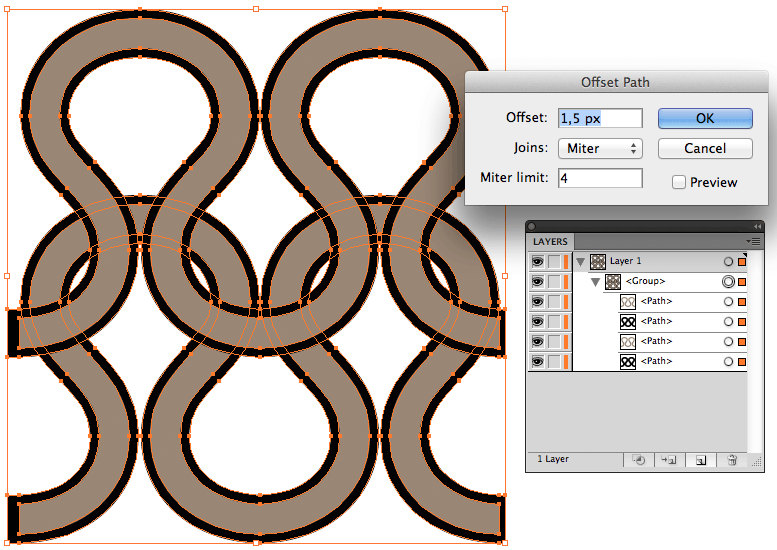
Select all and Go to Object > Path > Offset Path… set the value of path offset to 1 – 1,5px. Change the fill color of your new forms so that they are easily visible.

Step 7
Select all and click on Divide in your Pathfinder panel. Ungroup all – Shift+Cmd/Ctrl+G (or go to Object > Ungroup).

Step 8
Select the parts of the “loops” as in the image below and change their color to the one you applied to the offset path. Then select the parts of the offset path as in the image and change their color to the color of the loop.

Step 9
Select a part of the loop and go to the Select menu. Choose Select > Same > Fill Color, then click on Unite in the Pathfinder panel. Then select a part of the offset path, again to Select > Same > Fill Color and delete the selection. Go to Pbject > Path > Clean Up to delete all Stray Points and Unpainted path that have been created while dividing the objects.

Step 10
Create a rectangle 40px x 31px (dimensions correspond to the parameters of the transforms we’ve applied). Send it to back Shift+Cmd/Ctrl+[ (Object > Arrange > Send to back). Give it no stroke and no fill. Place your rectangle below the loops in the area where we created the intertwining effect (as in the image).

Step 11
We’re almost done, select all and drag to the swatches panel. Alternatively, go to Edit > Define Pattern .. Your new repetitive pattern appears now in the swatches panel.

And that’s it. Now it’s your turn to go further and experiment with intertwining patterns. I’m looking forward to your comments.
If you enjoyed this tutorial, please share and bookmark. Thanks.


Just great.
So technically defined. really i learned. Thank you.
Marco.